Angular 15
Create a Project
In this tutorial, divided in 7 parts, you will learn how to create an Angular 15 project and use its fundamental features in order to handle a simple CRUD application.
You will use framework's directives such as *ngIf, *ngFor and ngClass, template-driven forms, REST API and server side communication, dependency injection, errors handling and more.
This tutorial does not replace the official documentation but its goal is to get some practice with the fundamental Angular concepts.

TOPICS
- Goal
- Requirements
- Create an Angular project with Angular CLI
- Project Structure
- Install Bootstrap and font-awesome
Goal
Create an application to manage a list of users by using the following concepts:
- Angular framework directives:
ngIf,ngFor - Dynamic Styling
- Form and validations
- Create a Fake REST server to create "real-world" examples
HTTPClientand how to consume REST API services- Dependency Injection and State management with services
Following you can see the result you'll get at the end of the tutorial
.479af773_ZltIxA.gif)
Requirements
The only requirements you need to make this exercise is NodeJS version 16 or above
TIPS: multiple Node versions
if you need to install multiple versions of Node on your machine you might want to consider tools like nvm (node version manager). You could then have an Angular 10 project running on Node 12 and one with React that requires Node 18 at the same time.
Links: NVM Windows | Install on Mac using HomeBrew

Create an Angular project with Angular CLI
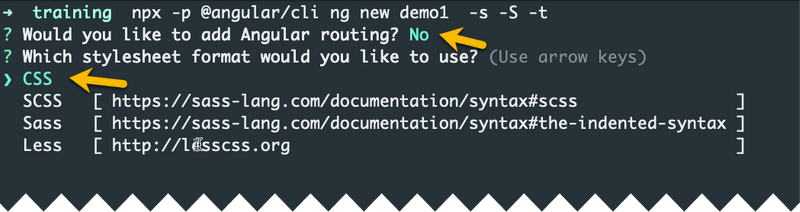
Open the terminal, go to the folder in which you would like to create a new Angular project and type the following command:
npx -p @angular/cli@latest ng new demo1 -s -t -SWhen asked:
- Ok to proceed?: Type
y - Would you like to add Angular routing?:
No - Which stylesheet format would you like to use: Use arrows and select
CSS
What is NPX?
The npx (Node Package eXecute) is an NPM package runner and it's automatically installed with Node and NPM.
It allows developers to execute any Javascript Package available on the NPM registry without even installing it.
So we use this command to download the latest Angular version, install all the dependencies and create a new project named demo1
npx -p @angular/cli@latest ng new demo1 -s -t -SOther parameters:
-t: enable inline templates instead of create external HTML files for components-s: enable inline styles-S: skip (unit) tests
Why do we set these parameters?
In Angular you can define the HTML and CSS in external files or, if you prefer, you can integrate them directly into the component. I prefer the latter solution because, in this way, we avoid too many files inside the application. It's a personal choice that not everyone likes so I suggest you use it to complete this tutorial and you can always switch to external templates in future projects.
Now you can open the terminal and run the project you have just created:
cd demo1           # go to project folder
npm start          # run project ... wait some seconds
Check if it works
After the project compilation, you can navigate to http://localhost:4200 and open the project in your favorite browser to get a preview. I suggest to use Chrome (or Firefox).
TIP
When you are creating an application:
- Check the terminal for compilation errors
- you should always keep opened browser DevTools to check if there are runtime errors, as shown in the image below
.8ec94397_2wLGRD.png)
Project Structure
Your project structure should look like to the following:
.f98ec4c0_T65r9.png)
Install Bootstrap and font-awesome
Open your terminal and kill the current process by pressing CTRL + C (probably you need to press it a couple of times).
Now you can install a couple of libraries by using some npm packages:
- Bootstrap: a CSS framework useful to quickly create HTML layouts
- Font Awesome (4.7): a set of free icons
Make sure you're in the project root folder and run the following command:
npm install bootstrap font-awesomeHow can I be sure I'm the root folder?
You're in the root file if it contains the package.json file.
Use dir command (Windows) or ls (Mac/Linux) to display the list of files:

Global CSS
Our goal is that all Bootstrap/FontAWesome CSS classes are globally available in our application.
The easiest way to include them is our project is by opening the angular.json file and update the architect.build.styles property.
So, open angular.json (you can find it in the project root folder) and recognize the styles property:
angular.json // ...
"architect": {
"build": {
// ...
"options": {
// ...
"styles": [ // <=== HERE
"src/styles.css"
],
}
}
// ...
}And now you can add the path of the minified CSS versions of the framework you have just installed:
angular.json{
// ...
"styles": [
"node_modules/bootstrap/dist/css/bootstrap.min.css",
"node_modules/font-awesome/css/font-awesome.css",
"src/styles.css"
],
// ...
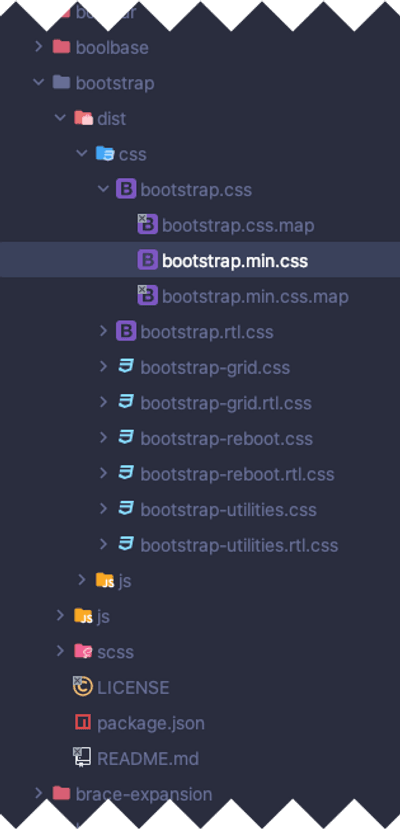
}How did I find the path to include in `angular.json`
You just need to open your node_modules folder, search the bootstrap or font-awesome folders and find the file path:
Check if it works
Now you just need to check if Bootstrap and FontAwesome are properly configured.
You have to kill the Angular CLI process by pressing
CTRL
+
C
and run npm start again to apply the changes you have done in angular.json.
Open src/app.component.ts and replace all the HTML template content with the following one:
app.component.tstemplate: `
<button class="btn btn-success">
<i class="fa fa-times"></i>
</button>
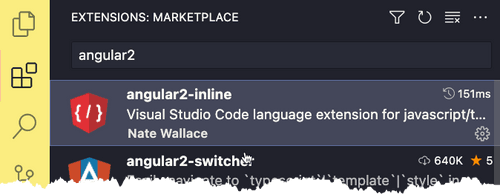
`VISUAL STUDIO CODE TIPS
Some IDE such as WebStorm supports Angular inline template out of the box.
Visual Studio Code (VSC) doesn't support them.
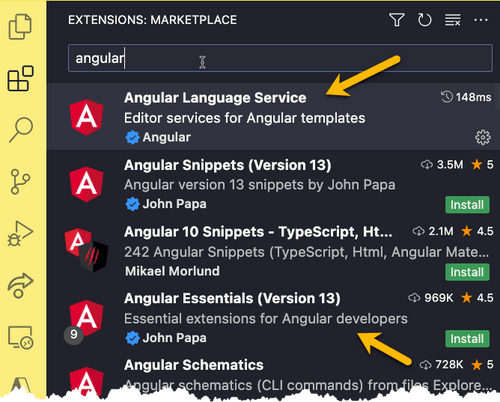
So I suggest to install the angular2-inline extension from the VSC marketplace
Anyway I also suggest to install the Angular Service extension or, much better, Angular Essential by John Papa (a pack of extensions thats already includes it and several other useful extensions for Angular)
Now you can save your work, wait a moment and you should see the following output in your browser (a green button with an x inside it):
.2515e894_Z1LEaDd.png)
You can now remove the <button> you have just created. It was just a test to check if libraries are properly configured 😅
So the AppComponent HTML template should now be empty or just contain a placeholder like an "Hello":
app.component.tsimport { Component } from '@angular/core';
@Component({
selector: 'app-root',
template: `
<h1>Hello</h1>
`,
styles: []
})
export class AppComponent {
title = 'demo1';
}Try it on http://localhost:4200 or use the interactive code playground below:
.652df6b8_Z2iH268.png)
(italian only)