Hello Angular (v15)
Tutorial for absolute beginners
In this step-by-step tutorial you will learn how to create dinamic HTML template in Angular, what is the interpolation, the differences between attribute and structural directives and familiarize yourself with Angular.

TOPICS
- Who is this tutorial for?
- Requirements
- Use StackBlitz
- Components
- Your first Angular example
- Add interactivity with Native Events
- Attribute directives:
[ngClass] - Class Methods
- Invoke methods from template
- Structural directives:
*ngIf - What's Next
Who is this tutorial for?
If you have never used Angular this is a good starting point.
In this short "step by step" tutorial you will develop your first hello world web application in Angular by the creation of a simple counter. You will learn how to create dinamic HTML templates, work with CSS, the concept of interpolation, the differences between attribute / structural directives and familiarize yourself with the framework.
Why another Angular tutorial?
Angular is a sophisticated framework and includes most of the functionality needed to create Single Page Application, also known as SPA. The Angular Documentation is amazing but it might seem a bit difficult and complex for beginners.
So I have created some tutorials trying to simplify many of the fundamental concepts of the framework and give you the opportunity to practice with some exercises
Requirements
You only need a browser and an internet connection since you'll use an online "Code Playground": StackBlitz. Although you can use this tool as a guest I really suggest you to login with your GitHub account to save your progress.
Why Stackblitz?
StackBlitz is a code online Playground and its editor is very similar to Visual Studio Code. You can use it to practice and make some experiments without installing anything on your machine.
- I like StackBlitz because it's a good compromise between speed and flexibility when compared to other code playgrounds
- you can save the your snippets for future use
- but the most important reason is that it's a cool way to share your code with the community and ask support sharing a working example. The community can then fork your example and reply with the solution
So I think it's convenient to get familiar with it

Use StackBlitz
After opening StackBlitz the first step is to authenticate with your GitHub account. Now you can select the StackBlitz Angular template but, as you can see, there are several other options: React, Svelte, Vue, RxJS and so on. So you can use it to practice with any other front-end technology.
The authentication is not a required step but you cannot save snippets in your profile without doing it
You can see how to create an Angular template in the animation below:
.496217c3_Z115QRk.gif)
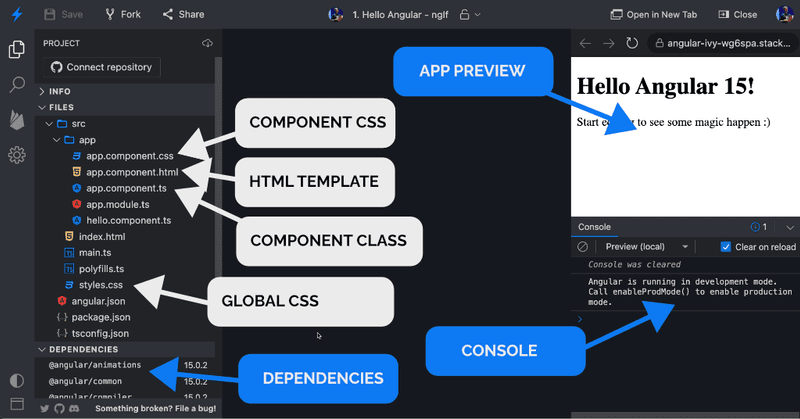
The Stackblitz window is very similar to Visual Studio Code:
- left side: project files and dependencies
- right side: application preview and the console panel
- center: the code editor
Components
Components are custom html elements (i.e. <my-component>) that allow you to split HTML templates and business logic into several and (often) reusable parts.
Some common scenarios:
- you want to create reusable UI components such as
<tab-bar>,<carousel>,<card>and so on... - you have an HTML page composed by 500/1000+ rows: you can then split the template into small parts to have more maintainable code and improve semantics.
Modern front-end frameworks are often based around the concept of components and each application usually have at least one component, known as "Root Component".
Each component is composed by 3 parts:
[name].component.html: the HTML template[name].component.ts: a TypeScript class in which you can define properties and methods that are accessible to the template[name].component.css: local CSS that are only accessible by the component itself (so it's not global!)
In this tutorial we will not talk about components but we will focus only on the dynamic management of templates through the use of directives and the basic features of the framework
Your first Angular example
Create a new Stackblitz (Angular Template), open src/app/app.component.html and replace everything with the following snippet:
<h1>{{ 1 + 1 }}</h1>The output (in the preview panel) will be 2.
The syntax {{expression}} is known as "interpolation" (or simply template tags) and allow you to embed valid expressions into your HTML template.
For example, you can use it to make math operations, display the value of class properties or insert a ternary operator.
<h1>{{ anyClassProperty }}</h1><h1>{{ condition ? 'A' : 'B' }}</h1>Add interactivity with Native Events
Your next goal is the creation of a simple counter that increment its value when a button is clicked.
You can simply add events to your HTML elements using brackets:
<div (mouseOver)="...">
<input (change)="..." />
<form (submit)="...">
Create a simple counter
Now open app.component.ts and add the counter property:
app.component.tsimport { Component } from '@angular/core';
@Component({
selector: 'my-app',
templateUrl: './app.component.html',
styleUrls: ['./app.component.css'],
})
export class AppComponent {
counter = 1; // <==
}
Open app.component.html, insert a button and add the click event listener to increment the counter property.
app.component.html<button (click)="counter = counter + 1">+</button>
<h1>{{ counter }}</h1>Click on the "RUN PROJECT" button below to see the working example:
Click the first icon on the left to display the project files
Why the template is updated?
Angular "change detection" is a built-in framework feature that ensures the automatic synchronization between the data of a component and its HTML template view. It detects common browser events like mouse / keyboard events, timers, HTTP requests and so on.
Conditional DOM
You can also use ternary operators inside your template tags.
Update app.component.html in order to increment and decrement your counter and display a different text:
app.component.html<button (click)="counter = counter - 1">-</button>
<button (click)="counter = counter + 1">+</button>
<h1>{{ counter }}</h1>
<div>{{ counter >= 0 ? 'positive' : 'negative' }}</div>
Brackets and Attributes
Use square brackets to dinamically set attributes and properties to any HTML element.
<a [href]="myProp1" [target]="myProp2">
<div [innerHTML]="myProp2">
<img [src]="myProp3">
Now we want to apply a different CSS class in according with the counter value: when counter >= 0: apply the red class, otherwise the green class:
app.component.html<div [class]="counter >= 0 ? 'green' : 'red'">
{{ counter >= 0 ? 'positive' : 'negative' }}
</div>Of course, you have to add the new .green and .red CSS classes in app.component.css:
app.component.css.green {
background-color: green;
}
.red {
background-color: red;
}Attribute directives: [ngClass]
A directive is a sort of custom HTML attribute that handle some logic behind the scenes and Angular provides several built-in directives to handle common scenarios such as DOM manipulation, apply dynamic styles, create list of elements and so on.
There are two types of directives:
- attribute directive: they are usually used to dinamically update the look and feel of your application and add behaviors, such as events. Attributes directives are often used with square brackets:
[directive]="..." - structural directive: used for DOM manipulation, for example destroy and re-create the DOM. Structural directives has always the
*prefix (*ngIf,*ngFor, ... ) that can be very useful to recognize them, since you cannot add more that one structural directive to an HTML element.
Some of the most used "attribute" directives are ngClass and ngStyle:
You may apply the active CSS class when the condition returns true:
<div [ngClass]="{'active': condition}">...or dinamically apply inline styles.
The following example increments the font-size in according with the counter value:
<div [ngStyle]="{'font-size': counter + 'px'}">In angular there are other cool ways to do the same operation:
<div [style.font-size]="counter + 'px'">or using the "suffix" operator
<div [style.font-size.px]="counter">
<div [style.font-size.rem]="counter">The *ngIf structural directive allow you to conditionally destroy and create DOM elements:
<div *ngIf="boolean | condition">Some content</div>*ngFor directive clones a part of the template looping through an array and it's used to display a list of elements:
<div *ngFor="let item of items"*>{{item.prop}}</div>You can also create your own custom directives.
For example, the following one may hide the HTML element if user is not logged. However, the creation of custom directives is out of the scope of this tutorial
<button *ifLogged>Some content</button>Class Methods
app.component.ts file is a TypeScript class and can contains methods.
it's often preferable to move your business logic into the class rather than in the template.
So now we'll move the logic to increment and decrement the counter value from the template to the class.
First, add the increment and decrement methods to app.component.ts:
app.component.tsimport { Component } from '@angular/core';
@Component({
selector: 'my-app',
templateUrl: './app.component.html',
styleUrls: ['./app.component.css'],
})
export class AppComponent {
counter = 1;
increment() {
this.counter++;
}
decrement() {
this.counter--;
}
}
And you can invoke these methods from the HTML template:
app.component.html<button (click)="decrement()">-</button>
<button (click)="increment()">+</button>
<h1>{{ counter }}</h1>
<div [class]="counter >= 0 ? 'green' : 'red'">
  {{ counter >= 0 ? 'positive' : 'negative' }}
</div>Invoke methods from template
So far we have not properly handled the "zero" value but we couldn't do it simply using a ternary operator in the HTML template.
We'll rather invoke class methods to add more logic in order to dinamically set the CSS class and the label to display:
we want to remove the CSS class and display a default message when the counter is zero.
First we add the getLabel and the getCls methods to handle the 0 value too:
app.component.tsimport { Component } from '@angular/core';
@Component({
selector: 'my-app',
templateUrl: './app.component.html',
styleUrls: ['./app.component.css'],
})
export class AppComponent {
// UPDATE: now start from zero
counter = 0;
increment() {
this.counter++;
}
decrement() {
this.counter--;
}
// NEW
getLabel() {
if (this.counter === 0) return 'Demo Counter';
return this.counter > 0 ? 'positive' : 'negative';
}
// NEW
getCls() {
if (this.counter === 0) return null;
return this.counter > 0 ? 'green' : 'red';
}
}and the HTML template will automatically invoke these methods each time the change detection is triggered:
app.component.html<button (click)="decrement()">-</button>
<button (click)="increment()">+</button>
<h1>{{ counter }}</h1>
<div [class]="getCls()">
{{ getLabel() }}
</div>PERFORMANCE
This approach can generate performance issues in complex views since these methods may be invoked too many times because of change detection.
A better approach would be the creation of custom pipes but it's out of scope of this tutorial.
Structural directives: *ngIf
*ngIf is one of the most used Angular directives and allow you to dinamically render or destroy HTML elements.
Now we can then remove the counter h1 element from the template when its value is zero.
app.component.html<h1 *ngIf="counter !== 0">{{ counter }}</h1>What's Next
Read the Angular Documentation to get more info and examples. It's amazing, well-written and always updated: I often read it again to discover something I didn't know until the day before 😅.
Or you can also read my next tutorial "Create a simple CRUD app with Angular" to learn how to create template-driven forms, display list of elements, use the dependency injection engine, communicate with REST API and more.
Support
Let me know if you liked it with a comment and don't forget to add me on Twitter, LinkedIn and YouTube.
You can also get free support on our Telegram Group | Angular Topic. We usually speak in italian but we will do our best to support you in English too.
(italian only)