
Angular 15
Features module, router and lazy loading
In this step-by-step tutorial you will learn how to create a multiview application using Angular 15, with custom ngModules (core, feature and shared), lazy loading, primary and nested routes

GOAL
Now we create the pages of the application. Each page is often associated to a specific URL, also knows as "route".
Our secondary goal is to split the code in several chunks by enabling "lazy loading" and optimizing the performance when the application starts.
For each route we create:
- a (feature) module
- its own routing module
- the main component loaded when the route is visited, also know as routed component
Here you can see the final result of this recipe:
TOPICS
- Create the pages
- Angular Router
- Router directives
- Challenges
- 1) Create the login route
- 2) Create the Shared Module
- 3) Add another component
- Source Code & Preview
Create the pages
So let's start creating the "Setting" Page.
This command generates the main (routed) component, its own "feature" module and a "routing" module.
Furthermore, it also adds a new path to the AppRoutingModule file, named settings:
ng g m features/settings --route settings --module app.module
It generates the following new folder:
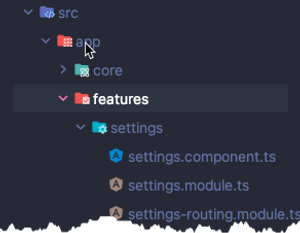
The "Routed" module is the module that will be associated to a route "path" and lazy loaded:
settings.module.tsimport { NgModule } from '@angular/core';
import { CommonModule } from '@angular/common';
import { SettingsRoutingModule } from './settings-routing.module';
import { SettingsComponent } from './settings.component';
@NgModule({
declarations: [
SettingsComponent
],
imports: [
CommonModule,
SettingsRoutingModule
]
})
export class SettingsModule { }The "Routing Module" defines the default component to load when the route is visited:
settings-routing.module.tsimport { NgModule } from '@angular/core';
import { RouterModule, Routes } from '@angular/router';
import { SettingsComponent } from './settings.component';
const routes: Routes = [{ path: '', component: SettingsComponent }];
@NgModule({
imports: [RouterModule.forChild(routes)],
exports: [RouterModule]
})
export class SettingsRoutingModule { }SettingsComponent is the component that will be loaded when the route is visited:
settings.component.tsimport { Component } from '@angular/core';
@Component({
selector: 'app-settings',
template: `
<p>
settings works!
</p>
`,
styles: [
]
})
export class SettingsComponent { }And now you can create other two routes, /home and /users:
ng g m features/home --route home --module app.moduleng g m features/users --route users --module app.moduleThe previous commands generate the following files:
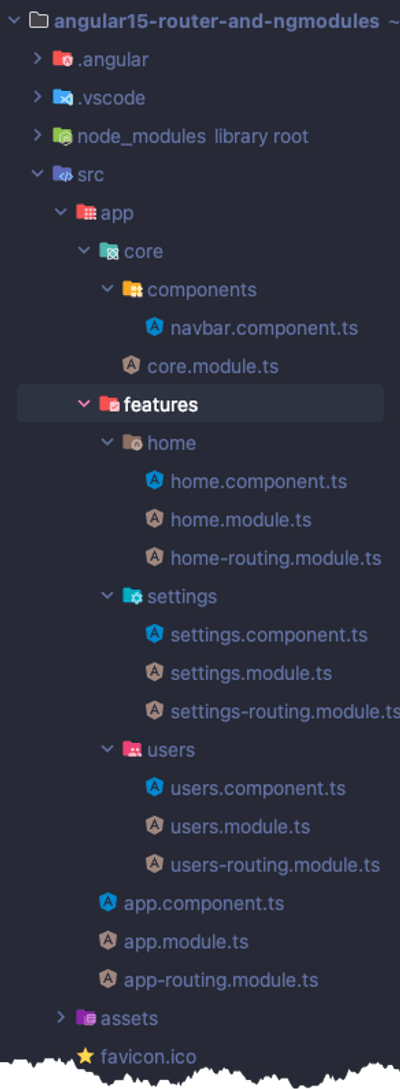
I love this command because the app-routing.module.ts is magically updated too, adding a new rule for each route / module and applying the "lazy loading".
app-routing.moduleimport { NgModule } from '@angular/core';
import { RouterModule, Routes } from '@angular/router';
const routes: Routes = [
{ path: 'settings', loadChildren: () => import('./features/settings/settings.module').then(m => m.SettingsModule) },
{ path: 'home', loadChildren: () => import('./features/home/home.module').then(m => m.HomeModule) },
{ path: 'users', loadChildren: () => import('./features/users/users.module').then(m => m.UsersModule) }
];
@NgModule({
imports: [RouterModule.forRoot(routes)],
exports: [RouterModule]
})
export class AppRoutingModule { }In fact you can now access each route through a specific url:
Angular Router
Now you need to create a fallback for users that:
- visit your application starting from the root:
http://localhost:4200 - visit a wrong path, i.e.
http://localhost:4200/anything
TIP
Use the wildcard **

Open app-routing.module and add the ** redirect:
app-routing.moduleconst routes: Routes = [
{ path: 'settings', loadChildren: () => import('./features/settings/settings.module').then(m => m.SettingsModule) },
{ path: 'home', loadChildren: () => import('./features/home/home.module').then(m => m.HomeModule) },
{ path: 'users', loadChildren: () => import('./features/users/users.module').then(m => m.UsersModule) },
// NEW
{ path: '**', redirectTo: 'home' },
];
TRY IT
You can now test if the default route works by visiting the default url:
it should automatically redirect to /home.
You can also try to use a wrong url, just like http://localhost:4200/anything, and you should be automatically redirected to the /home again.
Router directives
Update the navigation bar component to enable the navigation.
You can simply use routerLink and routerLinkActive directives included in RouterModule:
routerLink: simply navigates to a specified path without refreshing the applicationrouterLinkActive: apply a custom CSS class to the element when the browser url matches therouterLinkpath
First Step
Add RouterModule to core/core.module.ts since we use its directives in the NavBar component.
core.module.tsimport { NgModule } from '@angular/core';
import { CommonModule } from '@angular/common';
import { RouterModule } from '@angular/router'; // <=== NEW
import { NavbarComponent } from './components/navbar.component';
@NgModule({
imports: [
CommonModule,
RouterModule // <=== NEW
],
declarations: [NavbarComponent],
exports: [NavbarComponent]
})
export class CoreModule { }Second Step
Open core/components/navbar.component.ts and use routerLink and routerLinkActive.
You can just replace previous content copy-pasting the following:
navbar.component.tsimport { Component } from '@angular/core';
@Component({
selector: 'app-navbar',
template: `
<nav class="navbar navbar-expand navbar-dark bg-dark text-white">
<a class="navbar-brand">LOGO</a>
<div class="navbar-collapse collapse">
<ul class="navbar-nav">
<li class="nav-item" routerLink="/home" >
<a class="nav-link" routerLinkActive="active">Home</a>
</li>
<li class="nav-item" routerLink="/settings">
<a class="nav-link" routerLinkActive="active">Settings</a>
</li>
<li class="nav-item" routerLink="/users">
<a class="nav-link" routerLinkActive="active">Users</a>
</li>
</ul>
</div>
</nav>
`
})
export class NavbarComponent { }
Try it
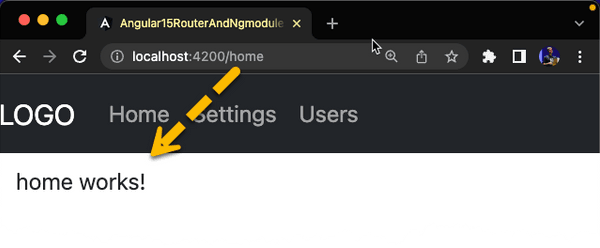
Now you should be able to navigate the application by using the navigation bar:
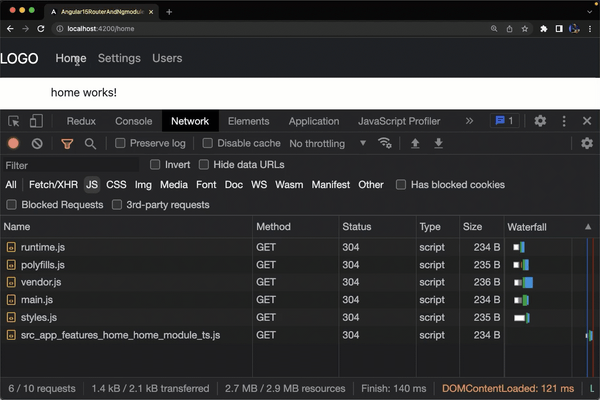
Now open the Network tab of your (Chrome) dev tools and check if each javascript chunk is loaded the first time you visit a route:
Challenges
Now it's time to learn by doing.
Try to complete next steps on your own:
1) Create the login route
a) Create a new route, as done before, named login.
b) Update the routing rules in order to load the login route when users visit the "index" path: http://localhost:4200/
TIP
Update AppRoutingModule: the "login" page should be shown when the path is an empty string:
{ path: '', ... }
2) Create the Shared Module
a) Create a new SharedModule in /app/shared
ng g m sharedb) Create a new component CardComponent in the shared folder, add it to SharedModule and export it in order to be used elsewhere.
You can automatically accomplish it by using the following command:
ng g c shared/components/card --flat --exportINFO
- we used
--flatto avoid the card folder creation - we used
--exportto add component in both,declarationsandexportsproperties, ofSharedModule
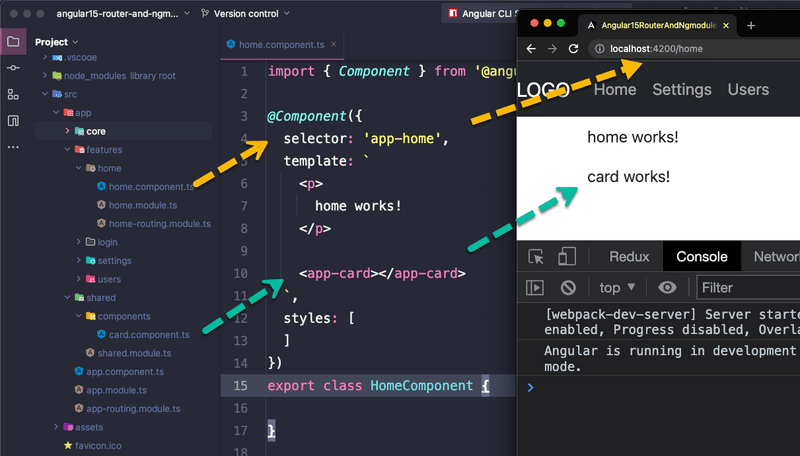
c) Now you can use the CardComponent component in HomeComponent.
TIP
Import SharedModule in HomeModule, so you can use <app-card> component in your HomeComponent HTML template.
d) Test your work. Open http://localhost:4200/home and you should see following output:
3) Add another component
Add a new component to SharedModule, named IconComponent, as done in the previous exercise, and use it in users.component.ts.
Source Code & Preview
Here you can see the final result:
(italian only)