

TOPICS
- Goal
- Requirements
- Create an Angular 15 project
- Migrate to a Standalone Application
- Use built-in directives:
ngIf ngFor: display a listHttpClientandasyncPipeprovideRouter: router config and lazy loading- The navigation bar
- TIP: use
defaultexport!
Goal
In this short "step by step" tutorial you will learn how to create your first multi-view Angular 15 application that uses standalone components
Requirements
The only requirements you need to make this exercise is NodeJS version 16 or above
Create an Angular 15 project
Open your terminal and use the following command to create an Angular project:
npx -p @angular/cli@latest ng new angular15-demo -s -t -SWhen asked, choose the following options:
- Would you like to add Angular routing?
No - Which stylesheet format would you like to use?
CSS
The @latest option will install the latest framework version.
If you want to create a project with a specific version you can also use @x.x.x (i.e. @angular/cli@15.0.0)

Migrate to a Standalone Application
The previous command will generate a "classic" Angular application that uses ngModules.
However we can now avoid to use modules in Angular 14+ projects and use (standalone) components only.
So open the main.ts file and replace all the content with the following in order to bootstrap your application with AppComponent instead AppModule:
main.tsimport {bootstrapApplication} from "@angular/platform-browser";
import {AppComponent} from "./app/app.component";
bootstrapApplication(AppComponent)
.catch(err => console.log(err))Update AppComponent
Your application still won't work because you have to set the AppComponent as standalone:
app.component.tsimport { Component } from '@angular/core';
@Component({
selector: 'app-root',
standalone: true, // <==
template: `
<div>Hello Angular 15</div>
`,
})
export class AppComponent {}You can now run the application to check if it works:
npm startOpen your browser and you should be able to see the result (just the Hello Angular 15 message) on localhost:4200 url.
You can now delete the app.module.ts file from your project.
Use built-in directives: ngIf
Now we want to use the *ngIf directive to toggle the visibility of a <div> element when a button is clicked.
In the previous Angular versions this directive was available importing the CommonModule in any module that needed to use it but, since we have deleted AppModule, you won't be able to use it anymore.
So your component needs to import into it:
app.component.tsimport { Component } from '@angular/core';
import { NgIf } from "@angular/common";
@Component({
selector: 'app-root',
standalone: true,
template: `
<button (click)="visible = !visible">Toggle</button>
<div *ngIf="visible">Hello Angular 15</div>
`,
imports: [
NgIf // you can also import CommonModule instead
],
})
export class AppComponent {
visible = false
}
.edee0530_Z26Pb7B.gif)
You can also import CommonModule instead a specific directive. For example instead of:
app.component.tsimport { NgIf } from '@angular/common';
// ...
imports: [
NgIf
],you can import the CommonModule that also contain all the other built-in directives, such as ngFor, ngClass and so on and all the pipes (json, date, async ...):
app.component.tsimport { CommonModule } from '@angular/common';
// ...
imports: [
CommonModule
],ngFor: display a list
Let's try to display a list of users getting them from an hard coded array.
As you can see from the script below, you also need to import the NgFor directive now:
app.component.tsimport { Component } from '@angular/core';
import { NgFor, NgIf } from "@angular/common";
@Component({
selector: 'app-root',
standalone: true,
template: `
<button (click)="visible = !visible">Toggle</button>
<div *ngIf="visible">Hello Angular 15</div>
<li *ngFor="let user of users">{{user}}</li>
`,
imports: [
NgIf, NgFor // or import CommonModule
],
})
export class AppComponent {
visible = false;
users = ['Fabio', 'Lorenzo', 'Silvia']
}
HttpClient and async Pipe
Now we want to fetch data from a REST API by using the HttpClient service.
We are usually used to importing HttpClientModule in AppModule to make it available everywhere but, since we don't have it anymore, we can now import it directly in the component :
app.component.tsimport { Component } from '@angular/core';
import { AsyncPipe, NgFor } from "@angular/common";
import { HttpClient, HttpClientModule } from "@angular/common/http"; // <==
@Component({
selector: 'app-root',
standalone: true,
template: `
<li *ngFor="let user of users$ | async">{{user.name}}</li>
`,
imports: [
HttpClientModule, // <==
NgFor,
AsyncPipe
],
})
export class AppComponent {
users$ = this.http.get<any[]>('https://jsonplaceholder.typicode.com/users') // <==
constructor(private http: HttpClient) {} // <==
}
However I usually prefer to import it in main.ts by using the provideHttpClient function as shown below in order to make all the HttpClient features globally available:
main.tsimport { bootstrapApplication } from "@angular/platform-browser";
import { AppComponent } from "./app/app.component";
import { provideHttpClient } from "@angular/common/http";
bootstrapApplication(AppComponent, {
providers: [
provideHttpClient() // <==
]
})
.catch(err => console.log(err))Of course you can now remove HttpClientModule from app.component.ts
provideRouter: router config and lazy loading
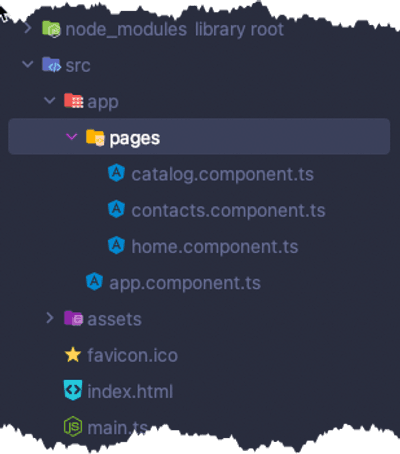
Now our goal is the creation of a multipage application using Angular Router. First we create the pages/routes, which are standalone components:
ng g component --standalone --flat pages/home
ng g component --standalone --flat pages/catalog
ng g component --standalone --flat pages/contacts
I use the --flat option to avoid the creation of a folder for each component:
Now we can update main.ts to define the router rules: each url path specifies what component it should load.
main.tsimport {bootstrapApplication} from "@angular/platform-browser";
import {AppComponent} from "./app/app.component";
import {provideRouter} from "@angular/router";
import {provideHttpClient} from "@angular/common/http";
bootstrapApplication(AppComponent, {
providers: [
provideHttpClient(),
provideRouter([
{path: 'home', loadComponent: () => import('./app/pages/home.component').then(c => c.HomeComponent)},
{path: 'catalog', loadComponent: () => import('./app/pages/catalog.component').then(c => c.CatalogComponent)},
{path: 'contacts', loadComponent: () => import('./app/pages/contacts.component').then(c => c.ContactsComponent)},
{path: '', redirectTo: 'home', pathMatch: 'full'}
])
]
})
.catch(err => console.log(err))
Lazy Loading & Dynamic Imports
The loadComponent property allow us to use dynamic imports and apply the lazy loading technique.
The navigation bar
Now we can update AppComponent to create a simple navigation bar.
Of course we may also create a standalone component but it's not important for understanding the concept.
app.component.tsimport { Component } from '@angular/core';
import { RouterLink, RouterOutlet } from "@angular/router";
@Component({
selector: 'app-root',
standalone: true,
template: `
<button routerLink="home">home</button>
<button routerLink="catalog">catalog</button>
<button routerLink="contacts">contacts</button>
<router-outlet></router-outlet>
`,
imports: [
RouterOutlet,
RouterLink
],
})
export class AppComponent {}We have to import RouterOutlet and RouterLink directives since we use them in the template
Now you can navigate the application clicking buttons:
.426515b4_Z1PM3UQ.gif)
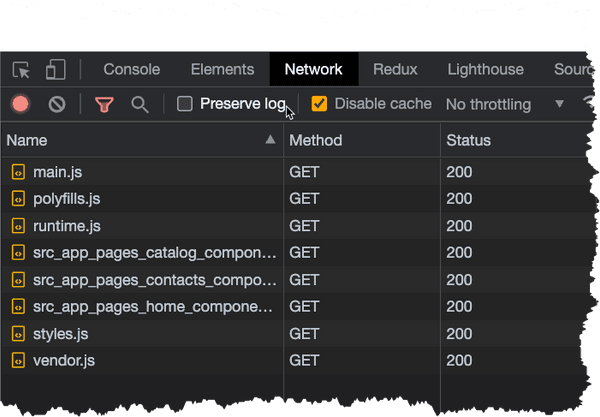
Lazy Loading in action
Open your browser Dev Tools -> Network to see how the application is now splitted in several chunks:
TIP: use default export!
To simplify the router configuration we can also export our components using default:
export default class HomeComponent {
  // ...
}
export default class CatalogComponent {
// ...
}export default class ContactsComponent {
// ...
}So we can now update the router rules as shown below:
main.tsimport {bootstrapApplication} from "@angular/platform-browser";
import {AppComponent} from "./app/app.component";
import {provideRouter} from "@angular/router";
import {provideHttpClient} from "@angular/common/http";
bootstrapApplication(AppComponent, {
providers: [
provideHttpClient(),
provideRouter([
// OLD
// {path: 'home', loadComponent: () => import('./app/pages/home.component').then(c => c.HomeComponent)},
// NEW
{path: 'home', loadComponent: () => import('./app/pages/home.component')},
{path: 'catalog', loadComponent: () => import('./app/pages/catalog.component')},
{path: 'contacts', loadComponent: () => import('./app/pages/contacts.component')},
{path: '', redirectTo: 'home', pathMatch: 'full'}
])
]
})
.catch(err => console.log(err))(italian only)